A Priming Task
Written by Mandy Withall and Noah Nelson
Mandy Withall is a volunteer Research Scientist at FindingFive. They are currently pursuing their PhD degree at Northwestern University.
Noah Nelson is VP of Product and has volunteered at FindingFive since 2017. He has a PhD in Linguistics from the University of Arizona.
In this tutorial, we will build a simple priming task on FindingFive. We'll provide sample code throughout that you can customize to build your own priming experiment!
Introduction
Also known as primed trials or paired stimuli, priming tasks present participants with paired sets of stimuli, typically with precise—and often very short—presentation durations.
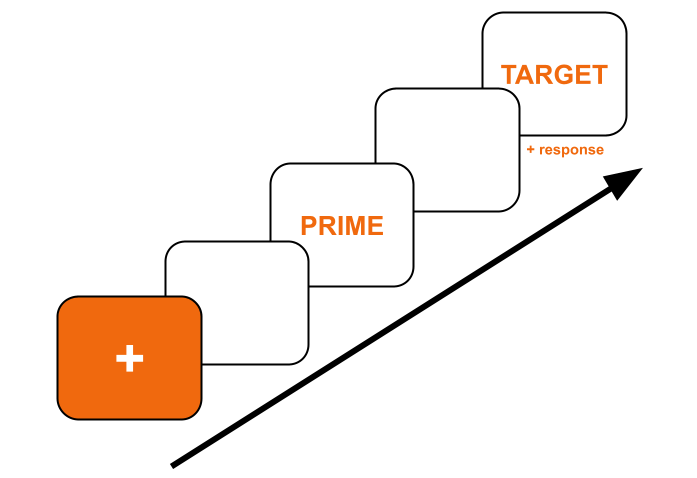
The basic priming trial structure, with fixation, prime, and target.
This progressive presentation of stimuli is common across a variety of fields in the social and cognitive sciences, such as linguistics and psychology. It can be used for priming, attentional blink, and other tasks that involve sequential presentation of stimuli within a single experiment trial.
In priming tasks specifically, researchers study how the brief, often subliminal presentation of a word (the "prime") influences reaction times to a different word (the "target"). Because researchers are more interested in how the primes affect reaction times, the actual task participants are charged with is often very simple.
In this article, we will demonstrate how to set up a semantic priming experiment using FindingFive. We will include a naming task, where we ask participants to say aloud what they see in a picture (e.g., "dog"). Our primes will be text category labels that are either related or unrelated to our target images, and our measured variable will be the time it takes participants to respond vocally.
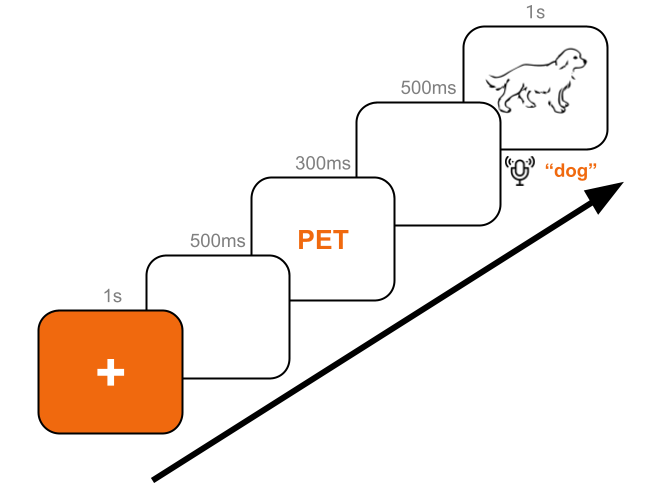
The trial structure for this study guide, with prime, target, and naming task.
This article will use text and image stimuli with a background audio response. However, priming tasks can be built on FindingFive using a variety of other stimuli and responses, including video and audio stimuli as well as rating, keypress, and forced choice responses.
The Semantic Priming Naming Task
In this task, participants will be prompted to look at a fixation cross before being presented very briefly with a semantic category label. Participants will then be shown a picture and asked to name what they see in that picture out loud.
Our goal is to see if using the appropriate category prime will speed up reaction times in the naming task. To do this, we will use a series of paired text primes and image targets. For our demo experiment, we will use six target images each belonging to one of three semantic categories. For each category, we will pair one target with its related prime and the other target with an unrelated prime, like so:
| Target Image | Target Label | Target Category | Prime |
|---|---|---|---|
 |
DOG |
PET |
PET |
 |
CAT |
PET |
FOOD |
 |
BANANAS |
FOOD |
OBJECT |
 |
CORN |
FOOD |
FOOD |
 |
COMPUTER |
OBJECT |
OBJECT |
 |
BALL |
OBJECT |
PET |
The set of target stimuli with an expected label, semantic category, and a related or unrelated category prime.
Creating Stimuli
To begin, we will create our six target image stimuli. Let's create the first stimulus now. Give it the name dog. In order to promote fast responses from participants, we will also limit the display duration for this image. The definition should look like this:
| A sample target image stimulus (click + for code explanations) | |
|---|---|
- All stimulus code must be encased between two curly brackets
{}(required). - Every stimulus must have a recognized
"type". In this case,"image"(required). - Every stimulus must include
"content". In this case, the name of the image file, with the file extension (required). - Setting
"alignment"to"center"ensures the image is displayed in the center of the screen (optional, defaults to"left"). - Setting
"duration"to1ensures the image will be displayed for 1 second (optional).
You will also need to upload the image file to your FindingFive account. You can find all of the images that we use in this tutorial here: (click to download).
Now that the first target is created, you can duplicate it to create our 5 additional targets. For each newly created copy, change its name to cat, bananas, etc. and its"content" to the appropriate file name ("cat.png", "bananas.png", etc.). Don't forget to upload those image files, too!
Info
FindingFive also supports batch-uploading stimulus definitions via a CSV file.
Next, we need to make our three category primes. Let's create the first one now. Give it the name pet. Since we don't want participants to be consciously aware of what the prime says, we will give it a display duration of just a few hundred milliseconds. The definition should look like this:
| A sample prime stimulus (click + for code explanations) | |
|---|---|
- All stimulus code must be encased between two curly brackets
{}(required). - Every stimulus must have a recognized
"type". In this case,"text"(required). - Every stimulus must include
"content". In this case, the text to display (required). - Setting
"alignment"to"center"ensures the text is displayed in the center of the screen (optional, defaults to"left"). - Setting
"duration"to0.3ensures the text is displayed for 0.3 seconds, or 300 milliseconds (optional).
Feel free to adjust the duration of the prime as you see fit. Now, duplicate this stimulus to make our 2 remaining category labels. Change the names of the copies to food and object, and their content to "FOOD" and "OBJECT", respectively.
Finally, we want to create two more stimuli. First, one that is called fixation and contains the simple text "+" displayed for 500 milliseconds (for this one, you may want to play with the "size" property of text stimuli to make it larger). Next, one that is called blank and contains a single space as text (" "), displayed for 500 milliseconds. Try to create them yourself based on the code above!
Spoiler! Code for 'fixation'
| The fixation stimulus (click + for code explanations) | |
|---|---|
- All stimulus code must be encased between two curly brackets
{}(required). - Every stimulus must have a recognized
"type". In this case,"text"(required). - Every stimulus must include
"content". In this case, the text to display (required). - Setting
"alignment"to"center"ensures the text is displayed in the center of the screen (optional, defaults to"left"). - Setting
"size"to"300%"ensures this text is displayed at 3x its normal size (optional). - Setting
"duration"to0.5ensures the text is displayed for 0.5 seconds, or 500 milliseconds (optional).
Spoiler! Code for ''blank''
| Sample code for "blank" (click + for code explanations) | |
|---|---|
- All stimulus code must be encased between two curly brackets
{}(required). - Every stimulus must have a recognized
"type". In this case,"text"(required). - Every stimulus must include
"content". In this case, the text to display (required). - Setting
"duration"to0.5ensures the text is displayed for 0.5 seconds, or 500 milliseconds (optional).
There, we have now created all the stimuli we will need for our priming task!
Creating Responses
Next, we need to create a background audio response. This response type allows you to collect speech data from participants without them having to press "record". It also includes handy features for:
- measuring reaction times by detecting the onset of audio input,
- displaying a "volume bar" to participants so they know they are being recorded, and
- automatically ending the recording when the aduio input ends.
Let's create this response now. Give it the name speech_detector. The definition should look like this:
| A sample background audio response (click + for code explanations) | |
|---|---|
- All response code must be encased between two curly brackets
{}(required). - Every response must have a recognized
"type". In this case,"background_audio"(required). - Setting
"onset_detection"totrueensures that FindingFive will automatically measure the time in milliseconds between the start of this background audio response and the beginning of audio input (optional, defaults tofalse). - Setting
"volume_visualizer"totruecauses a bar visualizing the currently received volume level to be displayed for the duration of the background audio response. This is useful for signaling to participants when they are being recorded (optional, defaults tofalse). - Setting
"stop_on_silence"totrueensures that the background audio response will stop recording when audio input ends (optional, defaults tofalse).
Next, we’ll show you how to combine these elements into priming trials.
Creating Trial Templates
Trial Templates organize stimuli and responses on trials and display them to participants. A key concept of trial templates is that each template defines a group of trials or trial phases of similar structure and function.
For example, we can make a separate template for each phase of our primed naming task. That is, we can make four trial templates, one each for the fixation cross, blank screen, prime, and target phases of our priming trials. Let's create the first trial template now. Give it the name "fixation_template". The definition should look like this:
| A sample trial template (click + for code explanations) | |
|---|---|
- Each trial template is defined with its name (user-defined) as the property and its definition as the value, encased between two curly brackets
{}(required). - Every trial template must have a recognized
"type". In this case,"basic"(required). - Trial templates use the
"stimuli"definition to determine how many trials to generate and which stimuli to display on each trial. The value is always a list (enclosed in square brackets[]), with the number of items equalling the number of trials to generate. In this case, 1 trial is generated (required if no"responses"are defined).
Now, use the fixation template as a model to create another trial template called "blank_template" that uses our "blank" stimulus to generate a blank screen. Try it yourself!
Spoiler! Code for ''blank_template''
| The "blank_template" trial template (click + for code explanations) | |
|---|---|
- Each trial template is defined with its name (user-defined) as the property and its definition as the value, encased between two curly brackets
{}(required). - Every trial template must have a recognized
"type". In this case,"basic"(required). - Trial templates use the
"stimuli"definition to determine how many trials to generate and which stimuli to display on each trial. The value is always a list (enclosed in square brackets[]), with the number of items equalling the number of trials to generate. In this case, 1 trial is generated (required if no"responses"are defined).
Next, we need to add a trial template for the prime phase of the task. Create another trial template called "prime_template" and populate it with our prime stimuli. Try it yourself!
Spoiler! Code for ''prime_template''
| The "prime_template" trial template (click + for code explanations) | |
|---|---|
- Each trial template is defined with its name (user-defined) as the property and its definition as the value, encased between two curly brackets
{}(required). - Every trial template must have a recognized
"type". In this case,"basic"(required). - Trial templates use the
"stimuli"definition to determine how many trials to generate and which stimuli to display on each trial. The value is always a list (enclosed in square brackets[]), with the number of items equalling the number of trials to generate. In this case, 6 trials are generated (required if no"responses"are defined).
Finally, we need a trial template for the target phase of the task. Create a trial template called "target_template". Since we want participants to respond to the target immediately, we will also include our "speech_detector" response in this template.
| The "target_template" trial template (click + for code explanations) | |
|---|---|
- Each trial template is defined with its name (user-defined) as the property and its definition as the value, encased between two curly brackets
{}(required). - Every trial template must have a recognized
"type". In this case,"basic"(required). - Trial templates use the
"stimuli"definition to determine how many trials to generate and which stimuli to display on each trial. The value is always a list (enclosed in square brackets[]), with the number of items equalling the number of trials to generate. In this case, 6 trials are generated (optional if"responses"are defined). - The
"responses"property defines which responses will appear on each trial. By default, a single response is repeated once for each trial generated by this template (optional if"stimuli"are defined).
And just like that, you have created all four trial templates that will generate our six primed naming task trials!
Creating the Procedure
The Procedure allows us to organize trial templates into Blocks and define the order in which to show those blocks using the Block Sequence.
We want participants to see a very specific order of stimuli:
- The
"fixation"cross - The
"blank"screen - The category prime (either related or unrelated)
- The
"blank"screen again - The target image with our
"speech_detector"response
All we need to do is define a block that puts our trial templates in the above order, and use FindingFive's "alternate_random" block pattern to automatically stitch trials together from across our specified trial templates and randomize the final presentation order of those composite trials. Here's what that looks like:
- All procedures in FindingFive must currently be
"type": "blocking"(required). - This
"blocks"property takes a set of curly brackets{}as its value, with each block defined within the brackets (required). - Each block is defined with its name (user-defined) as the property and its definition as the value, encased between two curly brackets
{}(required). - The
"trial_templates"property takes a list of trial template names, encased in square brackets[]. These are the trial templates used to generate trials for this block (required). - The
"pattern"property controls various presentation settings for the trials generated for this block (optional). - Setting
"order"to"alternate_random"ensures that one trial is pulled from each template in order and stitched together into a composite trial, and the resulting composite trials are then presented to participants in random order (optional, defaults to"fixed"). - All blocking procedures must define a
"block_sequence". In its most basic form, this is a list of blocks to present in order (required).
Congratulations! You have just built an experiment testing the effects of semantic priming on reaction times to a naming task!
Preview the Experiment
You can now preview the experiment by clicking on the “Preview" button above the stimuli section of the study editor. You can then choose to preview the entire experiment, or select individual blocks to preview in isolation. You can even download your own data at the end of the preview. If you notice anything that needs adjusting, make the changes to your study code and preview again—FindingFive gives you unlimited free previews of all your studies!
Conclusion
With this base, you can adapt your experiment to include all kinds of things. For example, you may want to include instructions and practice trials. Or perhaps you want to change the naming task to a lexical decision task, add masks to your primes, or convert the visual primes to auditory ones. All of these options are possible using FindingFive’s powerful Study Grammar.
Next Steps
Have you finished creating your study? Do you feel stuck on what to do next? FindingFive is here to help!
At FindingFive, we have all kinds of resources at your disposal to help you launch your study, find and pay participants, and collect data. Although FindingFive has its own participant base, we also have integrations with Mechanical Turk, Prolific, and your own institutional pool to help you utilize whatever participant pool fits your needs.
After you’ve collected data, FindingFive compiles it for you into an easy-to-read .csv file that can be opened in R, Python, Excel, Numbers, and more to facilitate easy analysis.